
DIY Modern Toilet Shelf from Wood – Smart Vertical Storage with a Designer Look
- ATC DESIGN

- Aug 1, 2025
- 2 min read
Updated: 5 days ago
Small toilets often lack storage and personality. No space for plants, decoration, or even extra toilet paper.
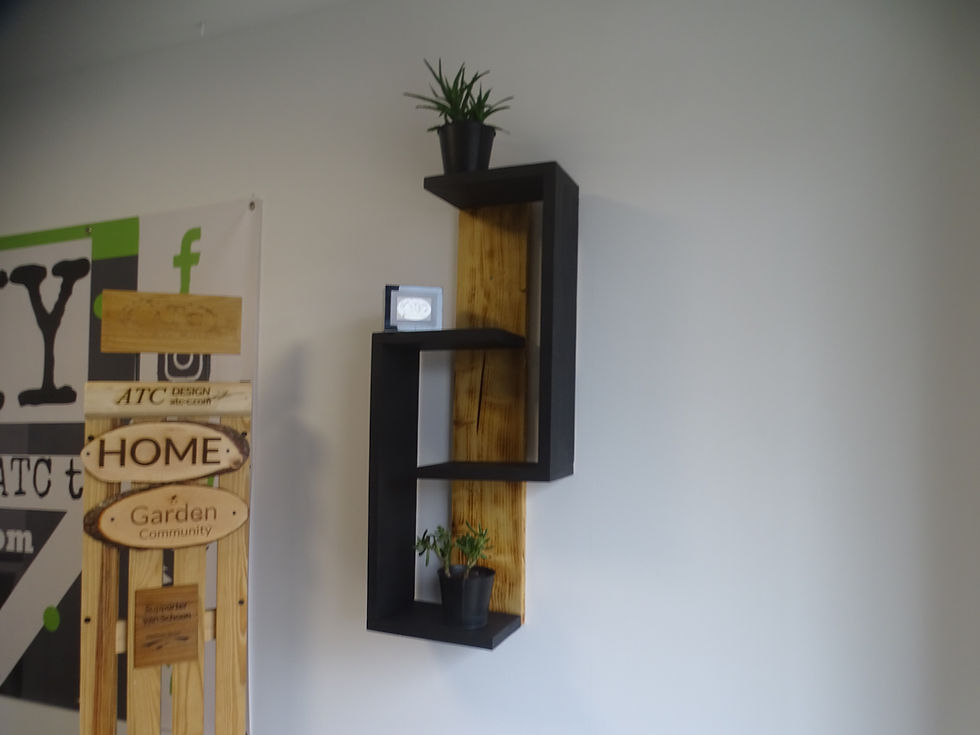
This DIY wall shelf made from wood solves that problem with a modern geometric design that looks like a designer piece while being built from 100% recycled materials.

It’s compact, stylish, practical, and perfect for using the empty wall space above your toilet.
This project is ideal if you want:
A space-saving wall shelf
A modern and minimalist decoration
Extra storage in a small toilet
A beautiful project made from recycled pallet wood
Why This Shelf Works So Well in a Toilet
Toilets are often small, narrow spaces where every centimeter counts. Instead of adding furniture on the floor, this shelf uses vertical wall space to create storage without clutter.
The contrast between the black geometric frames and the natural pallet wood gives a warm and modern look that fits perfectly in bathrooms and toilets.
You can store and display:
Materials Needed
1 EUR pallet (for the center wood)
wooden boards (for the black frames)
Sandpaper (80 → 120 → 240 grit)
Tools Required
Step 1 – Dismantle and clean the wood
Carefully dismantle the wood and keep the best boards.Sand them well to reveal the beautiful natural wood grain.
Cut a vertical board that will become the center spine of the shelf.


Step 2 – Create the Geometric Frames
From the wooden boards, cut strips to create 2 rectangular frames:
Bottom frame
Middle frame (shifted to the opposite side)
Top frame (aligned with the bottom)
This alternating layout creates the modern zig-zag visual effect.
Assemble each rectangle using screws and wood glue.


Step 3 – Fix the Frames together
Place the wooden board vertically.
Attach each frame to the board:
One at the bottom
One in the middle on the opposite side
One at the top aligned with the first
This gives the shelf both strength and its unique design.

Step 4 – Sand and Paint
Sand the frames until smooth and apply matte black paint.
Keep the wood natural to create a strong visual contrast.

Step 5 – Mount the Shelf on the Wall
This shelf is lightweight but strong.
Fix it to the wall using wall plugs and screws through the wooden board.
Mount it above the toilet to create instant vertical storage without taking any floor space.

Before finishing the project, you can watch the full step-by-step build in the video below.This will help you understand the assembly and positioning of the frames much more easily.
Conclusion
This DIY wooden toilet shelf shows how small spaces can become stylish and practical using recycled materials.
It’s an easy weekend project, beginner-friendly, low cost, and adds a real designer touch to your toilet.
And if needed please find a free 3D plan for you at this link: 3D PLAN
Mr ATC for another idea of housing throughout recycling


Comments